Be sure that hole is free of burrs and panel surface around hole is smooth and free of debris.
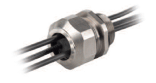
Insert the fitting's lower threaded portion through the mounting hole and hand-tighten the LOCKNUT as far as possible. Hold the BODY hex stationary with a wrench. Using a six-pointed socket or six-pointed wrench, tighten the LOCKNUT firmly in place. To see Heyco's Torque Charts visit the Cordgrip section for suggested torque values (LTF's, LTCG's, SCG's & Brass). Check to make sure the BODY hex is held flush and tight to the panel to insure a tight seal.
Insert the cable through the fitting to the desired position.
Hand-tighten the SEALING nut as far as possible. Hold the BODY hex stationary with a wrench. Using a second wrench, tighten the sealing nut until the cable is securely held in place.To see Heyco's Torque Charts visit the Cordgrip section for suggested torque values (LTF's, LTCG's, SCG's & Brass).
To disassemble for cable replacement, use a wrench to hold the BODY hex stationary and loosen the SEALING nut with a second wrench. Grip the disconnected cable and pull while turning the cable in the counter-clockwise direction.
Alternate Installation Instructions
Insert the cable through the fitting to the desired position.
Hand-tighten the SEALING nut as far as possible. Hold the BODY hex stationary with a wrench. Using a second wrench, tighten the sealing nut until the cable is securely held in place.To see Heyco's Torque Charts visit the Cordgrip section for suggested torque values (LTF's, LTCG's, SCG's & Brass).
Insert the fitting's lower threaded portion through the mounting hole and hand-tighten the LOCKNUT as far as possible. Hold the BODY hex stationary with a wrench. Using a six-pointed socket or six-pointed wrench, tighten the LOCKNUT firmly in place.To see Heyco's Torque Charts visit the Cordgrip section for suggested torque values (LTF's, LTCG's, SCG's & Brass). Check to make sure the BODY hex is held flush and tight to the chassis to insure a tight seal.
To disassemble for cable replacement, use a wrench to hold the BODY hex stationary and loosen the SEALING nut with a second wrench. Grip the disconnected cable and pull while turning the cable in the counter-clockwise direction.
Competitor Cross Reference
Use our cross-reference tool to find equivalent Heyco parts that match competitor products, ensuring compatibility and performance.
LET’S CONNECT
Talk to Our Experts Today
Have questions or need a specific part? Let’s connect and find the right solution for your project.